Aunt Emily

Emily Bowyer Hammel was my father's older sister. She was the dearest person I've ever known. Over several adolescent summers, she patiently taught me how to sew and how to cook. I loved her. Sadly, she has been gone these few years and I miss her very much. However, I am carrying on her legacy of sewing and trying to carry on her legacy of caring.
Showing posts with label Simplicity 3804. Show all posts

Sunday, March 9

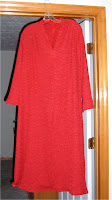
Finally Finished - Simplicity 3804 Red Knit Dress


Here it is, finished (but not ironed!), and hanging on a hanger in the office doorway. This one was a struggle, but I have it to the point it is acceptable. I had to take off the cuffs and reduce them in size, and narrow the bottom of the sleeve. I am still somewhat concerned about the fabric - after washing it is much more sheer than before.

I am going to write a review for Pattern Review tomorrow or Monday. I will take a photo wearing it then. Rating - sort of ho hum.

It has been snowing here for two days, so running to the store to get thread isn't really possible. There has been a Level 3 Emergency that does not allow driving. I included the second photo to show how close to running out of the red thread I came - the remaining piece was about 10 inches long after I pulled it out of the machine!

Thursday, February 21

Marking Hard to Mark Fabrics

Most marking for darts, pleats, etc. can be done with chalk or pencil. However, when you have a difficult fabric, such as this red knit, using tailor tacks works well. I am assuming that you will use a small slash for matching the diamonds, so save this process for other more difficult parts of the pattern marking. On this, I'm working on the red knit dress from Simplicity 3804
Step one, (left above) align your fabric and your pattern. With this stretchy knit, I pinned the fabric and pattern onto the ironing board to make it easier to handle. You will need to "unpin" selectively.

Step two, (right above) take a long double length of contrasting thread and thread a needle. In this photo I used black - I started with peach, but it didn't show up too well in the photo. Tie a big sloppy knot in the end. You will go through the pattern and fabric (both layers) with the threaded needle, pulling taut. Be careful you don't pull the knot through the fabrics. Clip the thread so it is about 2 or 3 inchs long.
Then tie another big sloppy knot and reach under the pattern and material sandwich, enter the fabric at a point just a bit to the top or bottom of the knot and pull through again. Do this for all the areas you need to mark.
Step 3, (left photo) when you have all your knots marked, you will gently pull the two layers of fabric apart. Do this a bit gingerly to get the feel. You will end up with your two pieces, each wit ha long thread and knot to mark the point you want to mark.
The next photo (righ) shows what the two layers look like with all the knots and threads, pulled apart.

Finally, I immediately pin to make the pleat or dart or whatever I'm marking. That way, you don't wonder later what matches what! In this photo you can see one side front piece with two large pleats pinned, the top and bottom of each pleat with a thread. Also a thread for the neckline pivot point.
And that is it! It looks scarier than it really is. This is an effective way to mark anything you can't mark with chalk or pencil.
At the Machine

This is what I have going right now. First, I am making one of the Sewing Workshop L2 bags (reduced to 75%) out of the Bohemian Manor by Jason Yenter fabric from In the Beginning. I'll post later about the interior of this bag.
Then, I have started on this Simplicity 3804 in the red knit - see previous posts!
An finally, I am making myself a Sewing Workshop L2 bag in Alexander Henry's Frida Kahlo fabric - I have pockets and straps ready, just need to put body together.

Sunday, February 3

Making Progress

I have been sewing today on the Simplicity top. I found I had to reduce the shoulders by about an inch on each side. Other than that, the design is fine. However the fabric I used is a B***H - it ravels constantly. It has made fitting more difficult. It is all put together however, awaiting the hem on the body and sleeves. I had to stop as my shoulders were aching.

I am going to switch back to my Viking. The Singer is nice, but for some reason the stitch length isn't a happy thing -I've been trying to get a zig zag that works, but it is either huge or tiny. So back to old reliable and keep the Singer for embrodiery!